# Reporting
# Reporting Overview
The Reporting feature gives administrators the power to create query based reports using both internal and external data sources. Reports can be viewed natively within the Portal or exported to Microsoft Excel.
# Report Editor
Administrators using SQL can produce complex reports with the PMG Report Editor. The Report Editor page is accessible via the rollover drop-down menu navigation path REPORTS, Report Editor. Reports created with Report Editor are made available to Report Builder, to allow users to generate configured reports without knowledge of SQL.
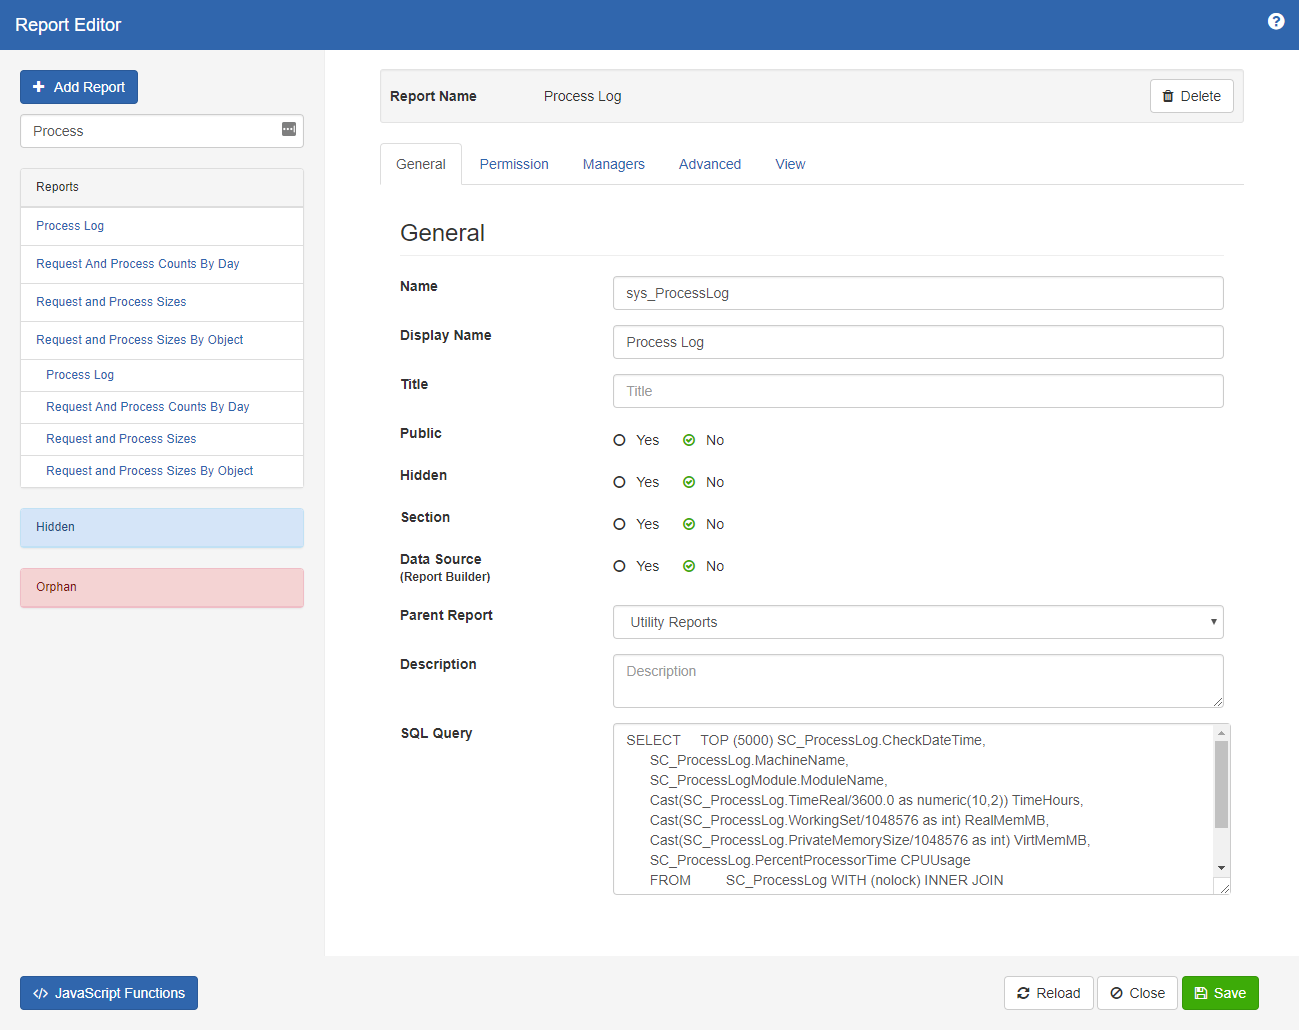 Selecting Report Editor will bring the
administrator to the Report Editor screen where a list of all available
reports is displayed. This list contains both custom created reports and
standard reports provided by PMG.
# Adding a New Report
To create a new Report, click the Add New Report button in the upper left-hand corner of the page, which will open a new interface on the right-hand side of the screen.
The following fields will be presented for configuration:
Name: Enter a unique Name for this report as it should appear when displayed in the report navigation index structure. Unique report display names are necessary to enforce specific user access settings. This is a required field.
Display Name: Enter a unique Display Name for this category as it should appear when displayed in the report navigation index structure. This is a required field.
Title: The Title field is a brief single line description of the service, and will serve as the name or label shown to end-users in the catalog. This is a required field.
Public: Reports can be designated as “public.” If checked, this setting makes the report accessible to anyone with permissions to view it.
Hidden: Reports can be designated as “hidden.” If checked, this setting will hide the Report from all standard users on the report navigation index structure, making it visible to System Admin users only.
Section: If a report is to belong to a parent it must be designated a “section”. Reports that are not checked as sections will still be created, but are stored as “orphans.”
Parent: This field allows the administrator user to associate the new Report being created with an existing Reporting Category. Every Report can exist as either a top-level Reporting Category, or as a sub-category. When creating a new top-level Reporting Category, no Parents should be selected. When creating a sub-category, one parent can be selected by scrolling through the list of existing Reporting Categories and selecting the desired parent from the drop down.
Description: This field can be used to display a brief description of the Report.
SQL: This field allows the Admin user to provide the proper SQL commands to query data in a relational database.
Permission: End-user access to reports in the catalog is based on view permissions granted at the individual report level. The Permission field within a Report definition is where the view access permissions for the Report are managed. It is not a requirement that users must be able to see a Reporting Category to view and/or order the reports contained therein.
Report permissions are assigned by way of Active Directory groups**.** Any AD group selected in this field will automatically grant all users who are members of that group access to the new Report.
The initial drop-down menu offers a list of all AD domains currently defined for the Platform, from which groups can be selected. Once a domain is selected, the administrator can enter group name (or partial sub-string name) to search on.
After searching, the administrator will be presented with a scrolling list of existing AD groups that match the name or sub-string entered. Using the group search results, the administrator can then highlight the desired group(s) and use the “Add ->” button to add them to the set of users who can access this new Report. Or, the “Add -->” button can be used to add all groups in the search results box to this Report. To remove any group from the Report, simply highlight it and click the “Del <-“button. These steps can be repeated as many times as needed until all the desired groups have been added.
Advanced: The advanced tab provides users with an additional set of features to further tailor reports.
View: Selecting the View button will provide report builders with a preview of what their report looks like.
# Editing a Report
To edit an existing Report, administrators and/or designated Report Editors can select the Report Editor option from the Reports drop down on the main Administration screen.
When selecting the Report Editor link from the main Administration menu, the Report Management screen will be displayed. From this screen, a new report can be created, or an existing report can be modified. Select a report from the list shown. Upon selecting a report the report editor dialog box is presented.
Once edits are complete, the user can click the Save button at the bottom of the page to save the changes. To undo any changes made prior to saving the changes via the Save button; the user can click the Reload button at the bottom of the page to restore the previous values in the Report. To delete the Report entirely, click the Delete button.
# Reporting Views
Platform data is accessible through a published set of views. To see the documentation for views, click on REPORTS, Reporting Views. The Reporting Views page lists the available database views and documentation for the views as well as the fields within the views. The Reporting Views page provides a link to “Preview Data” which displays a set of the current database view data as an example.
Database views provide the following advantages over direct database access:
Security: Data is more easily secured through views.
Stability: Views can implement built-in protections to minimize issues from direct table access, such as locking.
Intelligibility: Views can present data in a more meaningful manner, such as converting XML to table format.
Performance: Views can be indexed independent of source data.
Flexibility: In-place updates and additions may be added over time without impacting the core application schema.
Forward Compatibility: Views provide a layer of isolation from schema changes.
# Report Builder
Report Builder allows end users to build reports against available data through configuration, without SQL. Report builders can build reports from application data including submitted forms and work item related data as well as other data sources, including reports created using the Report Editor.
There is also basic charting capability which allows report builders to view their data as a pie, doughnut, bar, or line graph. Report Builder sources support submitted forms (Services), work item data (such as approvals and task states), and custom defined data sources (via other reports).
Using the reports builder end users can:
• View global and personal reports
• Perform keyword search across all columns
• Use smart search filters against a specific column from search bar (1 only)
• Sort by a selected column
• Apply custom filters
• Create, edit, update or delete personal views
• Change the chart type of personal views
• Chart draws based on first column
• Duplicate a view (personal or global) as a new personal view
• Export to excel
• Swap to full screen
Report, Catalog and System admins can do all the above, as well as:
• Create, edit, update, or delete global views
• Change the chart type of global views
# Enabling Report Builder
- The system setting, ENABLE_REPORT_BUILDER must be set to True
- The system setting, REPORT_DASHBOARD_SERVICE_REPORTING must be changed from 'None' to 'Any' or 'Admin'
- At least one form must be configured with reportable data. To enable reporting for a form data, see 'Manage, Reporting' from the Form Designer menu.
Note: Due to caching, it may be necessary to log out and log in to the application to trigger reloading of the report features and data. You may see "Access Denied, or there may not be any reportable data" if the above steps are not complete.
# Specifying Data Sources
# Data Source, Service(s) Questions
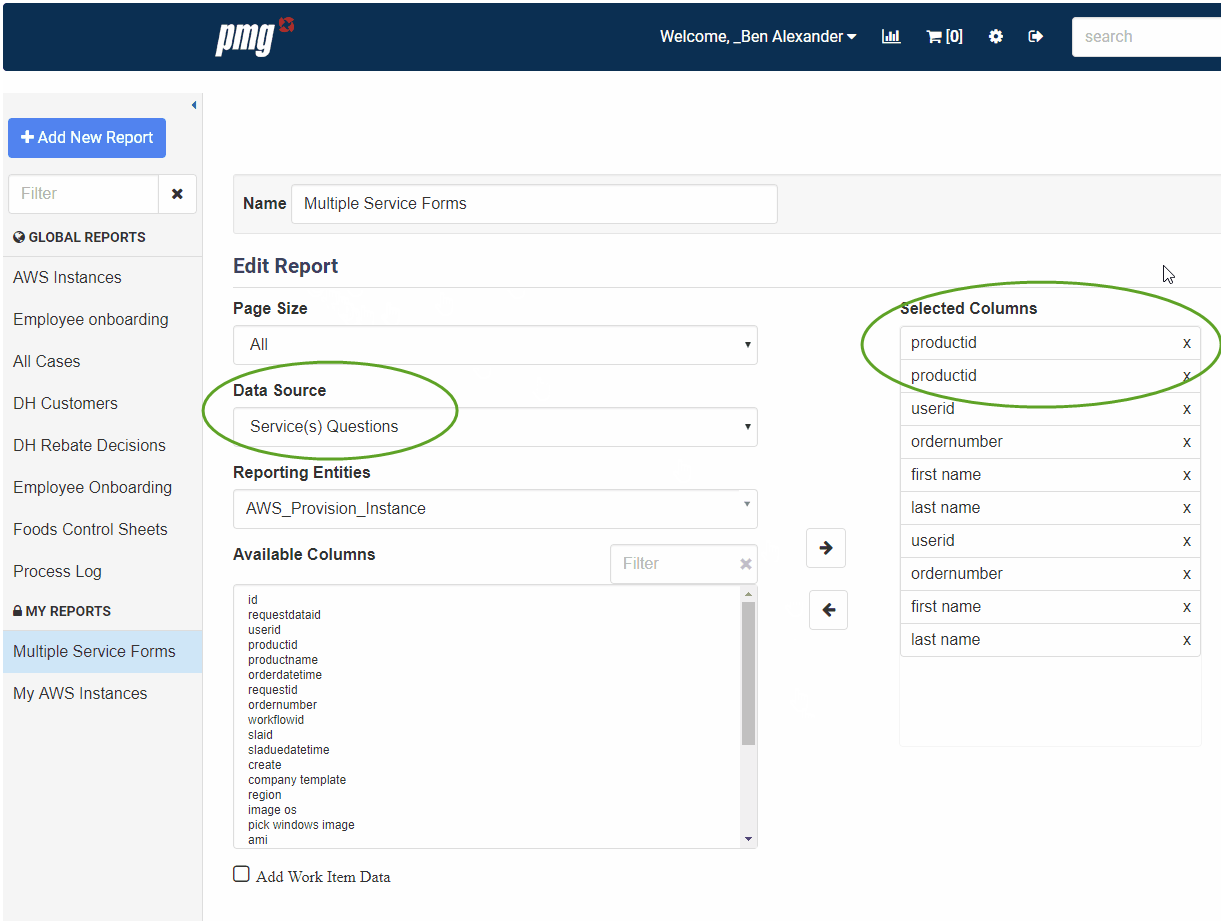
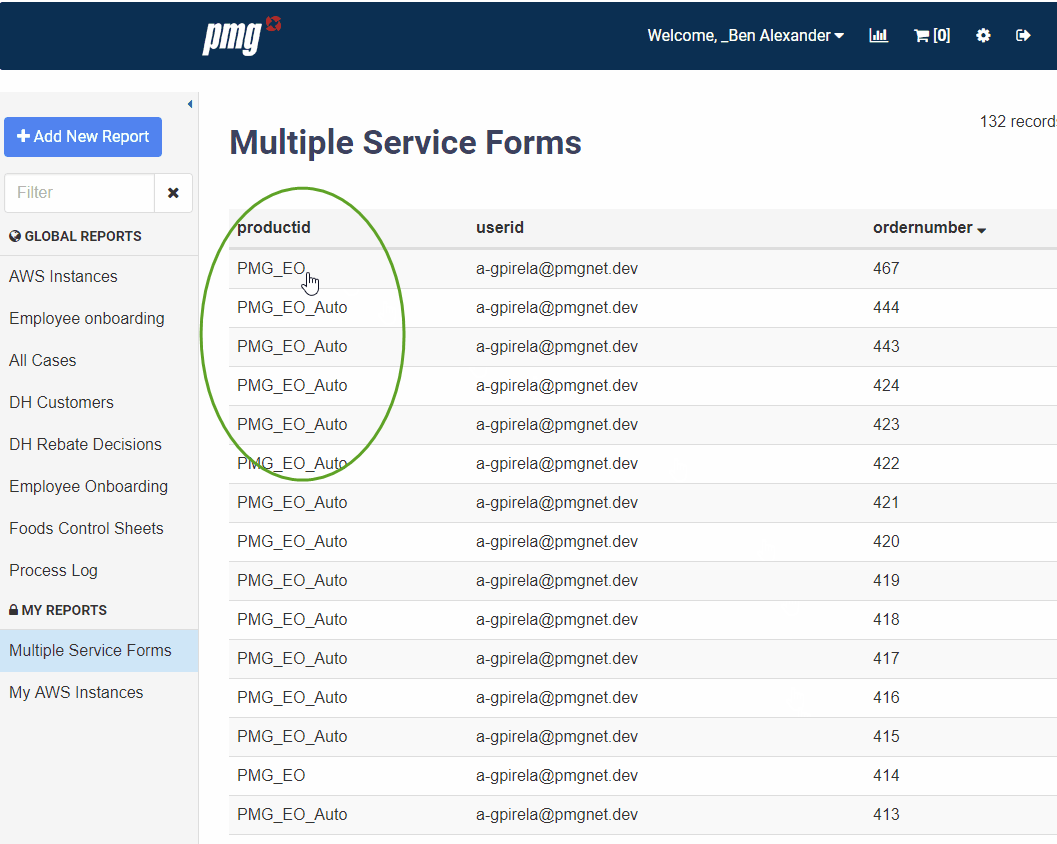
On the Edit Report section, Data Source for service questions be more than one service. As you add questions with the same name from multiple services, they are listed each time in the selected column section. During the display of the report, the columns will be merged.
# View global and personal reports
End users can select both global and personal reports from the drop-down menu.
# Report Builder - Permissions
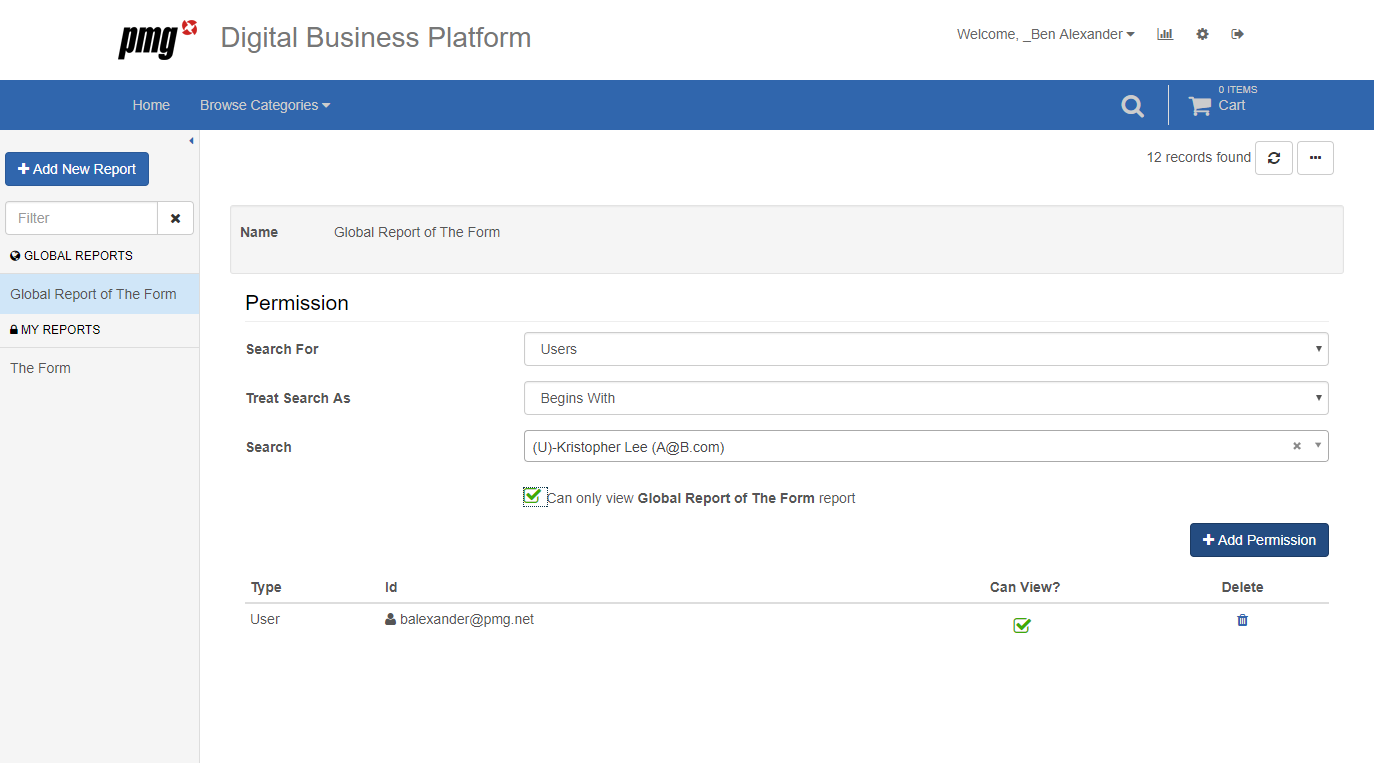
Permissions allow users to create and manage permissions for individual reports, allowing global reports to be viewed and edited by specific users and groups. To manage permissions, navigate to a report in the Report Builder, select the “…” icon, then select “Permissions”.
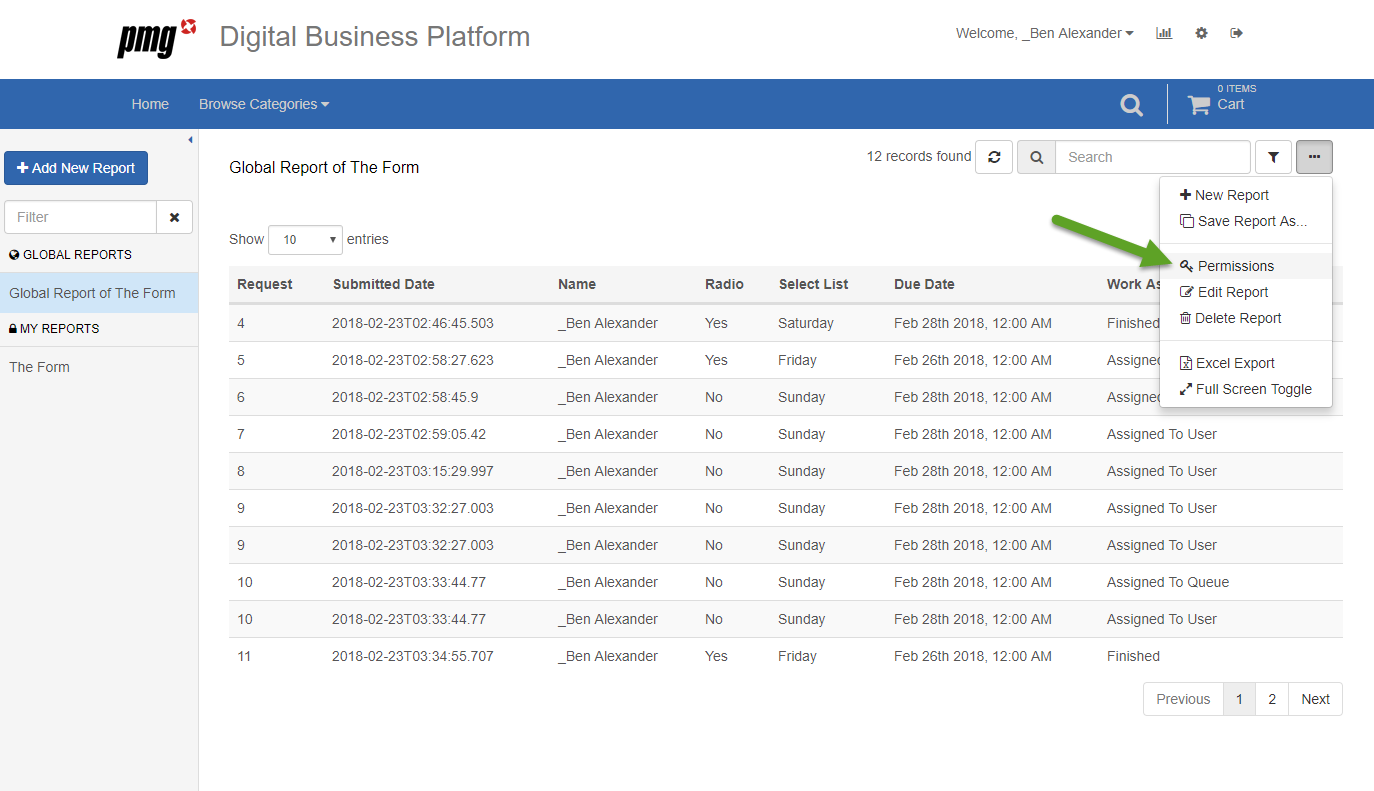
From the Permission screen displayed, select the user or group to add, then select “Add Permission”. By default, the user will have the ability to edit the report. To give users read only access to the report, check the box to set the permission to view only.
# Perform keyword search across all columns
To keyword search across all columns, simply enter your search text in the Search: box, then hit enter on your keyboard.
# Use smart search filters against a specific column from search bar (1 only)
Alternately, you can use smart search filters to search a specific column from the search bar. Enter your text in the Search box, then select the filter icon, and the column from the drop down.
# Sort by a selected column
Select the column to sort by then select whether to sort ascending or descending.
# Apply advanced filters
To apply advanced filters, select the Advanced Filters icon, then configure your filters. Keep in mind that additional rows will be cumulative.
# Create and manage personal reports
Users can create a new report by selecting the Menu icon, then selecting "New Report". The user will be prompted to name the report, opt to duplicate the current view, and if an admin, the option to create the report as a personal report.
Users also can delete personal reports by selecting the Menu icon, then selecting "Delete Report" and confirming to delete the report.
# Manage display columns of personal reports
Users can modify the columns that appear in their personal reports. From a user view, select the Report Settings icon.
From here, users can select from service data if the service reporting configuration has been set up and add them to the view. User can also select from built in reports. This allows you to control the main SQL behind the report but gives your end user the powers to report on the report and filter down to what is applicable to them.
Users can re-arrange display columns by dragging and dropping or remove columns by selecting the x icon. Additionally, users can modify the display name by selecting the column, then editing the Configured Display Name. Once saved, the report will be updated to reflect the changes.
# Change the chart type of personal views
There are five chart types to select from. Table is your traditional spreadsheet like view of data, but other options include Pie, Doughnut, Line and Bar. The charts draw based on first column, so drag and drop the applicable column to the top if using a chart.
# Export to excel
To export to excel, select the Menu icon, then select "Export to Excel". This will export the current views data to an excel spreadsheet.
# Swap to full screen
To toggle full screen, select the Menu icon, then select, "Full Screen Toggle". You can toggle back to the original view by following the same method.
# Report Dashboards
Based on the Report Builder framework, the Report Dashboard page extends the functionality to end-users to configure their own dashboard of charts and tables driven by the report builder.
# Enabling Report Dashboards
The Portal navbar provides a link to Report Builder reports for end users. To enable access, see the system setting, “ENABLE_REPORT_BUILDER”. Once enabled, Report Builder reports are accessed as below.
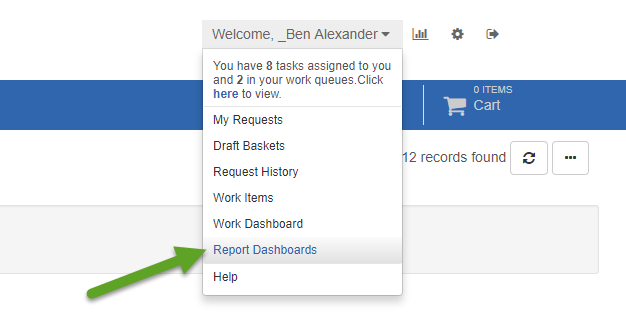
Once enabled, end users will be presented with the new feature with a launch page as below.
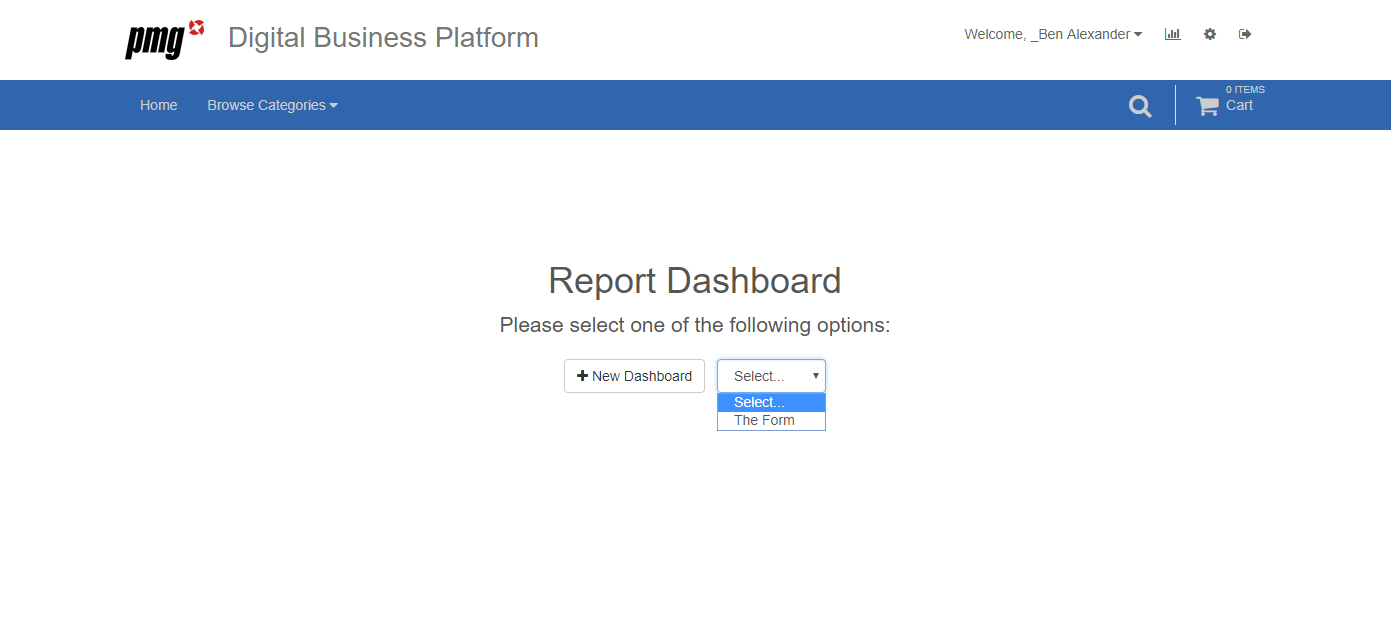
Users will be able to create and manage their own dashboards based on permissions and configuration of Report Builder.
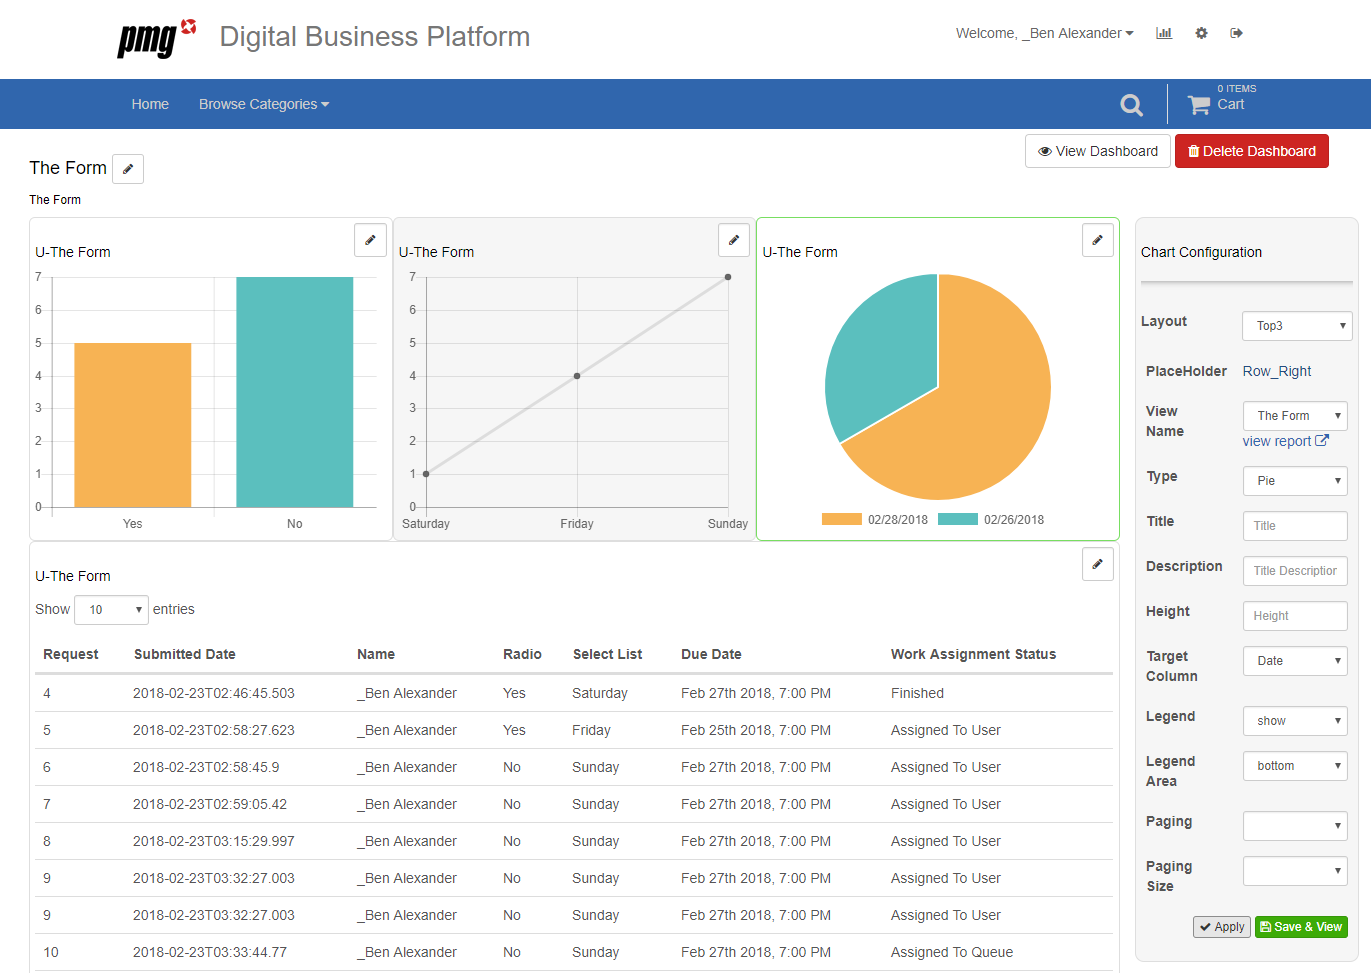
An example configured dashboard is below.
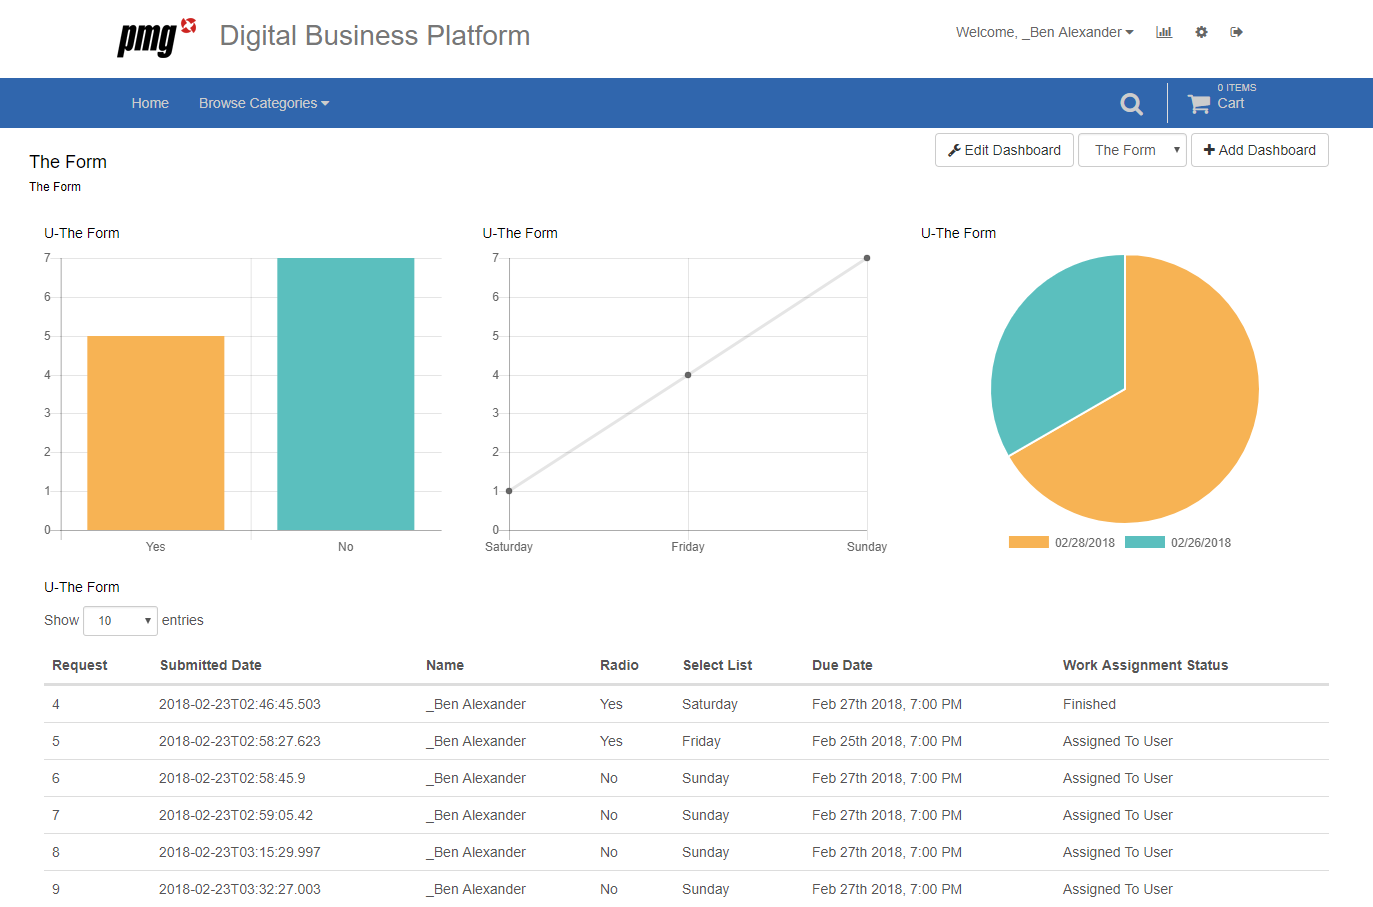
An example edit screen for the above dashboard is shown below.
# Reporting Configuration Framework
Form admins can control the questions that are available for reporting to users in the Report builder.
Select "Reporting Configuration" from the service form, then click the “Resample Submitted Questions” button. This will populate the most recent questions and mapping paths found in submitted forms.
Choose the question(s) that you want included for the services on Report builder or check the column header red box to include all questions. Once complete, select "Rebuild Reporting Data". This will rebuild your reporting tables and view for this service's data and include previously submitted request data.
# Where is the data stored?
To support the use of Reporting configuration on Service Forms (see Service Forms, Reporting Configuration above), dynamic tables and views are created in PMGSPE database, or a custom database that can be named in the REPORTING_DATABASE_DATASOURCE_NAME system setting. When using the REPORTING_DATABASE_DATASORCE_NAME, a matching entry needs to exist in the Admin, System Management, External Data Sources. Important note: The pre-requisite for leveraging the new reporting framework is the SQL login used for the PMGSPE or the custom configured database, needs privileges to create and modify schema.
# What tables and views are created?
When using the reporting feature, there are two tables and one view created per service. They are based on the service name.
Example – you have a service called: Onboarding
When using the reporting feature, you will have new tables and views. The first table is the standard question and answers from the form. The second table, which ends in Ext, will have rich form element question and answers.
Tables:
REP_Onboarding
REP_OnboardingExt
View:
REP_Onboarding_All
The new view will be the REP_Onboarding table joined with REP_OnboardingExt so that all questions and answers can be retrieved with a simple SELECT statement, or via the Report Builder.