# Scheduler
Scheduler actions are used to control the timing of execution of events.
# Timer

The Timer action allows for configuration of as many timed event(s) as needed, based on a fixed time window, weekly recurring, or date-based timing.
Timer Details management window will present a radio set of options where you can start to add new timed or scheduled events.

Time Span – indicates an event or output to be triggered after a designated period has elapsed, either once only, or on a recurring basis
Weekly – indicates an event or output to be triggered on a specific day of the week and time, either once only, or on a recurring basis. The “Skip today if time already past” helps prevent the timer from running instantly if the time has already past for the given day when workflow starts.
Date Criteria – indicates an event or output to be executed on a specific calendar date and time, to be initiated X number of days before or after a given date/time criteria
Once you select the desired type of timed event to add from these radio buttons, click the “+ Add” button at the bottom left to enter the required details.
Time Span Based Events
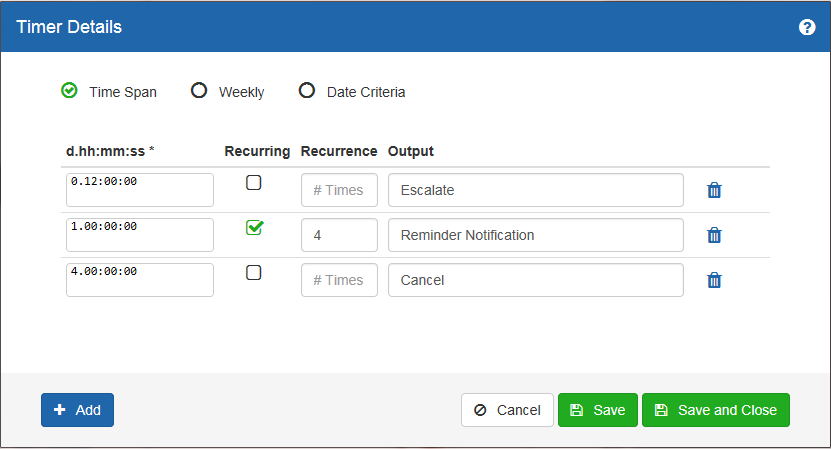
When adding a Timer event based on “Time Span,” you’ll be presented with the following fields for each event row being configured:
d.hh:mm:ss – this field designates how long after the Timer step initially executes before its corresponding Output should fire; the column label specifies the expected format for the time duration to be associated with the event; the time duration value entered here should reflect this exact format, with integers separated by a period or colon (days.hours:minutes:seconds)
Recurring – checkbox field to designate whether this timed event should trigger after the specified time duration on a recurring basis; if not checked, this event will fire the designated Output one time only
Recurrence – if the Recurring checkbox is checked, an integer value is required in this field to specify the number of times the timed event should recur; if skipped, it will default to “1” and effectively set the event to occur once only
Output – designates the output path to follow in the workflow design when this timed event executes

The Output value in each row added here will be available in the workflow designer when connecting the Timer action to another step in the design. You can use the trash can icon on the right-hand side to delete any event row as needed. Once the desired timed events are set, click “Save and Close” to exit this management window.
Weekly Events
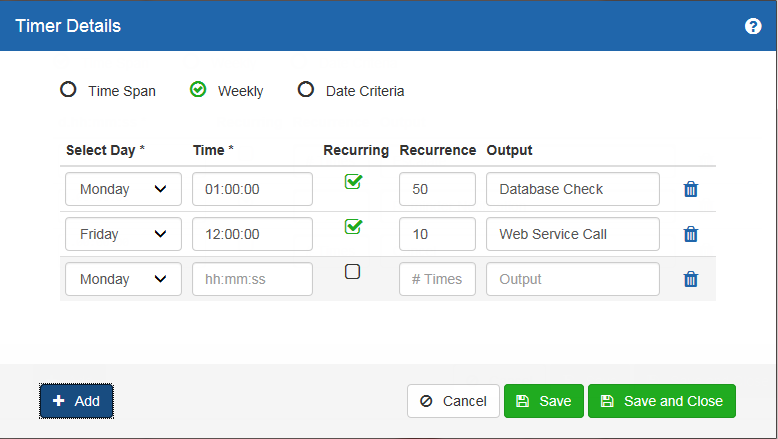
Setting up Weekly based Timer events will work essentially the same way
as Time Span based events, with the following fields to
configure:
Select Day – drop-down menu to specify the day of the week for the
new event to execute
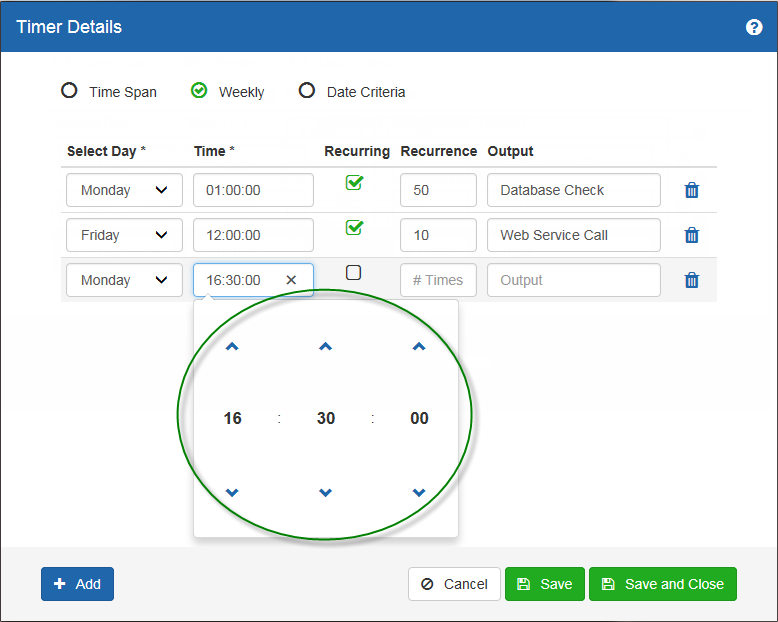
Time – using the time picker control provided, designates the exact time at which the new event should execute on the selected day; the required format for this field is (hh:mm:ss), in a 24-hour time model
Recurring – checkbox to designate whether this event should trigger at the specified Time on the selected Day of the week every week; if not checked, this event will fire the designated Output one time only
Recurrence – if the Recurring checkbox is checked, an integer value is required in this field to specify the number of times the Weekly event should recur; if skipped, it will default to “1” and effectively set the event to occur once only
Output – designates the output path to follow in the workflow design when this Weekly event executes
When initially adding a row to the Timer Details management window, the Time value must be entered manually in a forma t of “hh:mm:ss,” reflecting a 24-hour time model. However, when editing the Time value for a previously saved Timer row, clicking the field will open a rotator tool, with the current time value displayed. Using this rotator, you can adjust the hours, minutes, and/or seconds as needed to make the desired update. The time entered will be treated as the local time of the application servers, and will not consider daylight saving time (DST).

The Output value in each row added here will be available in the
workflow designer when connecting the Timer action to another step in
the design. You can use the trash can icon on the right-hand side to
delete any event row as needed. Once the desired timed events are set,
click “Save and Close” to exit this management window.
Date Criteria Events
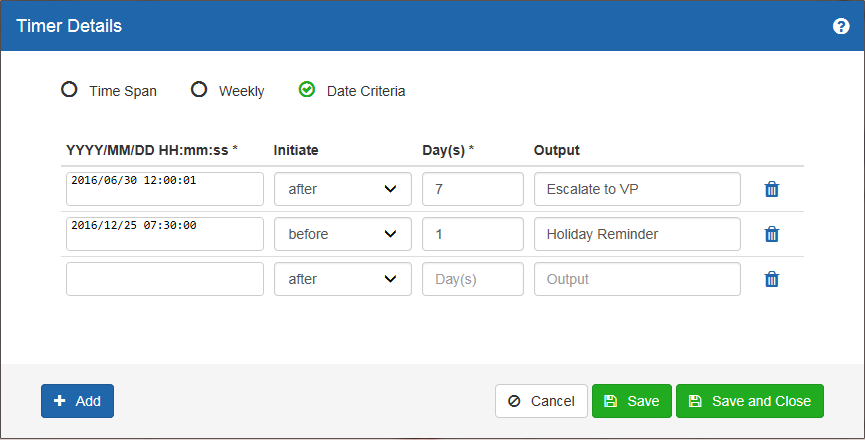
When adding a Timer event based on “Date Criteria,” you’ll be presented with the following fields for each event row being configured:

YYYY/MM/DD hh:mm:ss – the label for this column represents the required format for date values to be entered here. This value can leverage dynamic values from workflow. Use the keyboard shortcut “CTRL-Space” to open a context menu to find workflow values.
Initiate – drop-down menu to indicate whether the event should execute before or after the designated time on the designated date
Day(s) – integer value to indicate the number of days before or after the designated Date/Time when this event should trigger
Output – designates the output path to follow in the workflow design when this Weekly event executes
The Output value in each row added here will be available in the workflow designer when connecting the Timer action to another step in the design. You can use the trash can icon on the right-hand side to delete any event row as needed. Once the desired timed events are set, click “Save and Close” to exit this management window.
Sample Scenarios: If a workflow activity fails to create a ticket in a third party help desk system, a Set Custom Timer activity could be used to retry the action one or more times after a specified period (e.g., after 5 minutes, after 1 hour, and/or after 1 day) before proceeding. Or, a Set Custom Timer action could be set as recurring, where it schedules a daily inventory check on an external system before triggering any new supply orders.
Action Outputs: In addition to the custom “Output” values specified in the Schedule Time property, the Set Custom Timer action can also return the following values when being controlled dynamically by a corresponding Control Custom Timer action:
Paused – followed when the controlled activity is paused
Resumed– followed when the controlled activity is resumed
Stopped– followed when the controlled activity is stopped
Action Properties:
Label
A label for the activity
Properties
Timer Details (required)
This property is used to specify the scheduled time(s) for executing this action by selecting an existing workflow variable and assigning it to a specific output value
See the above description of this actions properties for configuration options.
# Timer Controller

Action Function: The Control Custom Timer activity can be used to pause, resume, or stop a Timer activity in a workflow dynamically.
Sample Scenarios: When a Timer activity is running to trigger daily work to occur, a Timer Controller can pause the timer if a condition arises where the work should not be done for a period of time. Another Timer Controller action can then resume the timer when the work should continue.
Action Outputs: The Timer Controller activity returns the following values:
Successful – followed when the activity is successful in controlling the specified Timer activity
UnSuccessful – followed when the activity is unsuccessful in controlling the specified Timer activity
Action Properties:
Label
A label for the activity.
Properties
Action Name  (required)
This property is used to specify the Timer activity to be controlled. To set this property, enter the ID of the target Timer action in the text field provided.
Action Output  (required)
This property is used to specify the desired behavior of the Timer activity being controlled. The field offers a drop-down menu with the following options:
Pause – pauses the Timer activity being controlled
Resume – restarts the Timer activity that has been previously paused by another Timer Controller action
Stop – stops the Timer activity being controlled entirely